

The only thing I might enjoy more than messing around with vintage philately is making a cool gift out of it. This is a simple, fun and inexpensive craft project for all ages. Only a few simple tools are required. Don't be afraid to get crazy with bold colors and patterns.
Here's what you will need:
Pencil
Tacky glue
Glue stick
Mod Podge
Scissors &/or papercutter
Cardboard (or in my case, used old 12" record sleeve)
Cardstock &/or scrapbooking paper
Rubberstampers (optional)
(Vintage) philately
How to make a stamp covered notecard:
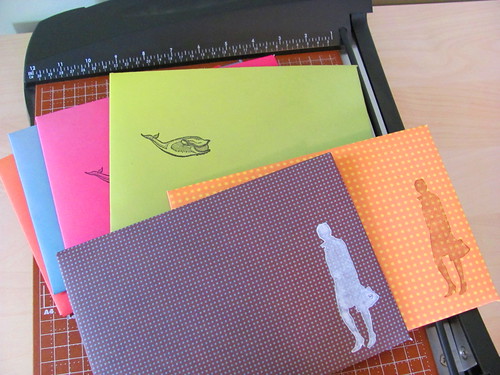
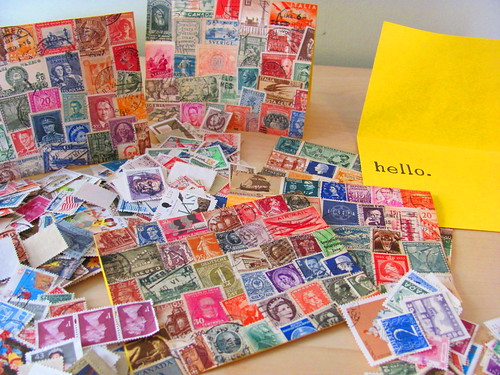
1. Cut out your (blank) cards. The size is up to you. I took 8 1/2" x 11" cardstock, halved it (creating two 5 1/2" pieces), folded those in half, thus making 2 cards from each sheet of cardstock. Once your cards are cut, you can stamp a message inside of them. I chose a simple "hello." or you can just leave them blank.
2. Quickly cover the entire front of the card with glue from your glue stick and start applying your stamps. I like the layered look. I layed mine out in rows and added more glue to the bottom of each layer to ensure that all of the stamps were well adhered to the front of my card. Once you've finished one card, repeart this process on the rest.
3. Gently apply Mod Podge to the stamps on your cards. I use my fingers to apply it because I like to feel what I'm doing, although some prefer to use a brush. Don't use too much Mod Podge. Just drizzle out about a fingernail-size's worth. Once all of the Mod Podge has been applied, let your cards set out to dry over night.
4. After your cards have dried, put them under some heavy books for a night so they are pressed firm and flat. After a night's worth of pressing they should be ready to go. In the meantime you can start on your envelopes.
How to make your own envelopes:
1. The first step in making an envelope involves creating the envelope templates. Simply choose any size envelope that you already have lying around, open it up and unglue the flaps.
2. Use your open envelope to create your cardboard envelope template which you can keep and reuse again and again. Simply trace the envelope onto the cardboard and cut it out. The "cardboard" I used was from an old 12" record sleeve. I created two templates, one to cut the envelope paper with and one to fold the envelope paper around (cut to the size of the "front" or "back" of the envelope).

3. Lay your envelope template on your scrapbooking paper. Trace around the envelope template with a pencil onto the scrapbooking paper.
4. Cut out your envelope shape along the drawn outline. I used a papercutter to be precise but scissors will do.
5. Use your rectangular template to fold and crease your envelope shape around. At this point it will be obvious where you should apply the Tacky glue to 'seal' the envelope.
6. This step is optional but I like to press my envelopes under some heavy books overnight (as well as the notecards) for extra firmness. Also, you can rubberstamp on the envelopes to add some extra flavor.
When working on paper crafts of this nature, I like to make a whole bunch at once and bust them out like I'm working on assembly line. Just to give you an idea of how easy this project is, pressing time aside, it took me under an hour to make 6 notecards and envelopes.
I hope you've enjoyed my first tutorial!
No comments:
Post a Comment