Thursday, June 27, 2013

Work In Progress

Even though I was born in South East Asia, I grew up in Western NY.  Having spent the bulk of my existence in semi-arctic weather, summer is my least favorite season.  I simply cannot deal with extreme heat or humidity and summers in RVA are the worst!  Even though I've been down here for 3 years, I doubt I will ever truly adjust to this disgusting weather.  But the irony of summer in the South is that while most people are spanning time outdoors, I seek shelter indoors under the cool breezes of central air conditioning.  I'm extremely productive with crochet-work in the summer.  I crochet everyday and of course, I have no shortage of unfinished projects to keep me busy.  Here's a peek at two works in progress.


This is a wave patterned scarf I started yesterday.  I'm using doily yarn and very thin light weight yarn that might as well be doily yarn.  Each "wave" (set) is 14 stitches.  So to make a scarf of this width, you need to start by chaining 56 stitches + 2 for 4 sets.  3 is the magic number in this pattern.  The the basic pattern is like this for one set:

3 HDC in 1, 3 HDC on their own, 3 HDC tog, 3 HDC tog, 3 HDC on their own, 3 HDC in 1

The little variegated row is simply a double crochet stitch all the way across.


My other work in progress is what over the years, I've come to refer to as the bane of my existence.  I started making the squares for this afghan when I was still in elementary school.  Since then, I'll make a handful of squares per year but I'm laying down the law.  No more lolly-gagging.  I am finishing this afghan - THIS YEAR - if it's the last thing I do!


Tuesday, June 25, 2013

Crochet Granny Square Baby Blanket

In August of 2012, I met up with my penpal, Amy from Sydney, Australia in Washington, DC.  After 20 years of penpalling, it was our first time meeting in real life.  It was an extraordinary experience that I'll never forget.  Recently Amy had a beautiful baby girl.  I knew she was on the way and I was crocheting like mad to finish this super soft crochet granny square baby blanket for her arrival.

Here's a few images of the process of the blanket's assembly.


So many squares, so little time!


Eat, drink, crochet!


Border patrol.


Finished at last!


Full frontal.


From the back.


Saturday, June 22, 2013

Hand Stamped Clothing Tag Tutorial

It's dumping bucketloads of rain down on Richmond, VA right now.  So what better time to pour out another cup of tea and type up this fun and easy to follow hand stamped clothing tag tutorial?!  But first I'll share a bit of background on the subject at hand. 

Earlier this month I met up with some other VA-based Etsians from the Etsy VA team out in Short Pump.  They've been meeting on a monthly basis, sharing ideas, (local) business opportunities and creative inspiration.  It was a fantastic meeting and it really inspired me to start taking the handmade portion of my business more seriously.  I've been wanting to grow my handmade Preciousowl brand and establish a local, physical presence in addition to what's already established online.  All of the other women I met up with sell at local craft shows and many of them also sell on consignment locally and elsewhere.  I've been wanting to do both but between records, stamps and everything else in life, I just haven't had the time to create enough handmade inventory to pursue these avenues.  While many of the goods that I sell in my etsy shop are supplies, many are also handmade.  Of course, this could all be in head but I think my online presence is more of a supplier than anything.  However, my goal for this Fall is to create an entire range of my own branded handmade clothing and accessories.  I want to build enough inventory to grow my handmade business and take it to the streets!  Even just typing about it helps to make it feel more real. 

Much of my creativity is a product of my thriftiness and building your own business isn't cheap.  I'm not a total cheapskate but I do take pride in practicality.  Recently I was browsing etsy, looking for a place to get clothing tags printed.  But after hours of browsing, I wasn't totally satisfied with the results.  The best price I could find for the highest quality tags was about $40 + S&H for about 100 custom tags.  Between the handling time and every seller's inane policies, I came to the only natural conclusion.  Why not just make my own tags?!  I made 40 tags in about a 1/2 hour.  I used vintage linen fabric that Troy brought home from work & craft supplies already on hand, so aside from the time I enjoyed making the tags, I spent zip, zilch, zero, making them.  But even if you had to buy most of these supplies brand new, it would still cost under 40 bucks.  So let the tag making tutorial begin!
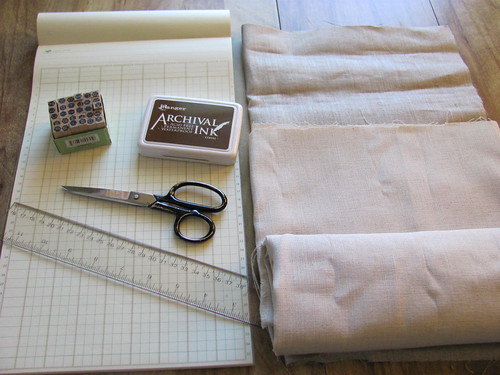
Supplies

At least a yard of smooth linen or cotton fabric (this should be enough to make 100 tags)
Scissors
Ruler
Pencil
Archival ink stamp pad (I used Ranger brand - acid free, permanent & waterproof)
Alphabet stamper
Iron
Sewing machine (optional, for finishing purposes only)


1) Iron your fabric.


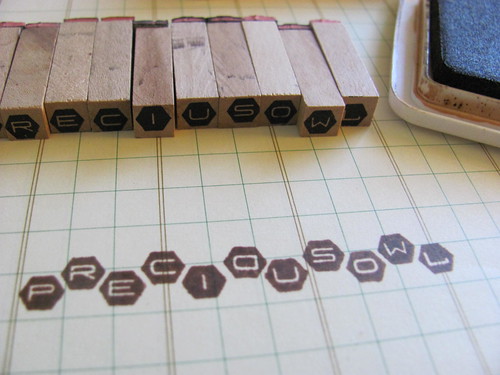
2) Stamp out a test proof of your tag on regular paper.


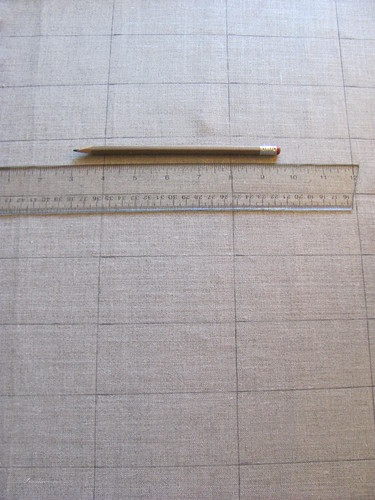
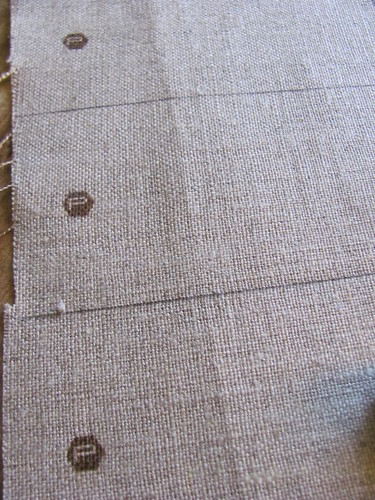
3) Measure your proof with a ruler and then sketch out a grid on your fabric allowing enough room between each tag for folding and/or sewn finished edges.  In my case, my proof measured 2 3/4" x 3/4" so I made each block 4" x 2".
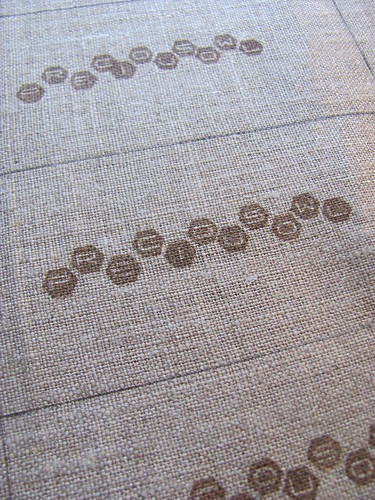


4) Stamp away!


5) Now your tags are essentially finished.  You can cut them out and use them as you like.  Keep the raw edges if you like the DIY look, but if you want to make them look extra professional, you can follow these optional steps.
 
 
Finishing the tags
 
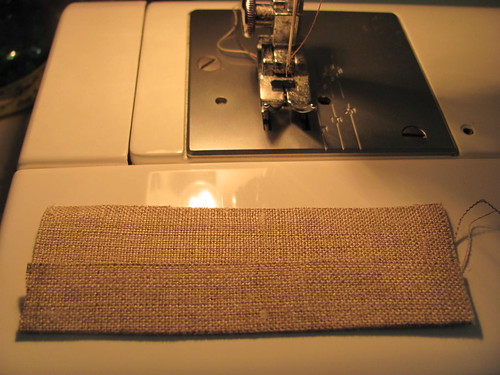
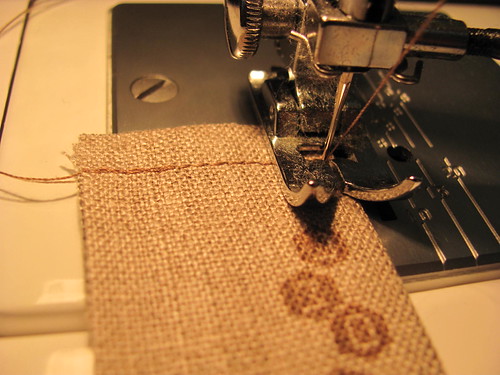
1) Fold the bottom of the tag behind the front.  Press with an iron.
 
 
2) Stitch a border around 3 sides of the tag (leaving the top open).  Reverse stitch the beginning and end of the border for extra security.


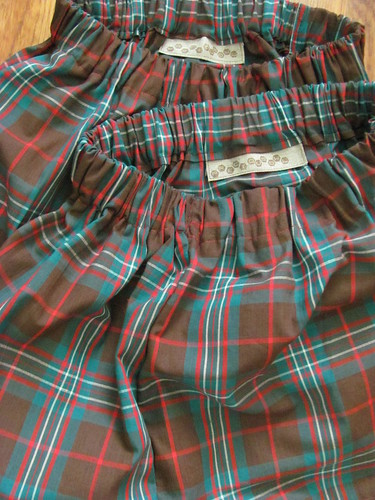
Now your tags are finished and ready to be inserted into all of your groovy creations!


Inserting clothing tags into your garments
 
1) Position the tag under the seam before you stitch it.
 
 
2) Stitch your seam.

 
Voila!


Tuesday, June 18, 2013

Proud Rainbow Crochet Granny Square Pillows

A while ago I blogged about these crochet granny square doily pillows that I made.  In a similar fashion, I just created these Proud Rainbow pillows to match the Proud Rainbow afghan I crocheted in my previous post (available in my etsy shop).

 
I "wrapped" my own handmade pillows with granny squares.  I made the backs of the pillows all black for variety. 


The bright rainbow colors really pop!

Crochet Granny Square City, baby!

I've literally been crocheting my fingers off lately and finally have some finished pieces to share.  I started both of these afghans when I was in my teens and have worked on them on and off over 2 decades!  It's hard to describe what finishing an afghan is like to someone who hasn't done it before but it's an amazing feeling.  It's this beautiful creation that you've spent hours, weeks, months and years with.  In my case, it might've even travelled with you around the globe.  You've nurtured it along to perfection.  Sometimes you wake up next to each other or fall asleep in its arms.  With every finished row, your pride grows.  When you're finally finishing off the edges and hiding all of the ends, you are so excited, you can barely steady your hook.  And best of all, when you've finally finished one afghan, now you can start work on starting or finishing the next one!


If you're interested in purchasing either of these afghans or other work that I've crocheted or would like to request a custom order, please don't hesitate to contact me directly or visit my etsy shop.


Tuesday, June 11, 2013

Crochet Doily Mesh Bag

Nautical, netted crochet work is a hot trend this summer.  I actually started seeing some great styles around last summer and earlier this spring and now they seem to be popping up everywhere.  A while ago I crocheted these votive candle holders.  The other night I decided to try my hand at creating a little netted bag for them.  For the base of the bag, I started with a very basic doily design.


Then I just "fish-scaled" my netting over each loop, row upon row.  I didn't refer to a specific pattern, I just made it up as I went.  In this case, I chained 10 stitches for each loop.  I connected my fishscales in the center of each loop.  When I got to the top of my bag, I DC-ed around the edges and made a little DC-ed carrying handle/strap.


It was a quick and fun little project with great results!